How to Conquer the Challenges of Designing Window Treatments for a Custom-Built Home

Amy and Nathan in front of fireplace with tall sheers.
TL;DR — Designing Window Treatments for a Custom-Built Home
Custom-built homes demand early design planning—especially for custom window treatments that require reinforced framing, wiring, and structural support.
Amy & Nathan’s project shows why starting before construction begins allows for smarter choices, fewer setbacks, and room to pivot.
A step-by-step, flexible approach prevents costly mistakes when fabrics don’t behave as expected, furniture changes, or construction issues (like ductwork routing) interfere.
Professional collaboration ensures every detail—from fabrics to automation to installation—is aligned with the evolving design of the home.
The end result: a beautifully cohesive home where eclectic design pieces feel intentional, warm, and full of soul.
Few moments in life are as exciting as building a custom-designed home. The freedom you enjoy to create a living space that speaks to your personal style is incredible! However, what homeowners often discover, is that the real cost of a custom build is overcoming the challenges that come with doing something original and unique.
Our clients Amy and Nathan were in passionate pursuit of something unique.
Their design featured skyscraping showcase windows, curved walls, and an elegant, modern, statement-piece fireplace.
Within their uniquely-architected walls, they planned to set their eclectic style free, gathering a diverse selection of furniture, artwork, and design features all of which held deep meaning personally.
In short, they were searching for the soul of their home.
Their window treatments would need to complete this visual representation of the soul, tying diverse design elements into a cohesive whole.
The biggest challenge of window treatments and interior design in a custom-built home.
The biggest challenge of a custom build is time.
There are always challenges and delays. Things change along the way, which makes it difficult to maintain a unified style to a design and manage the practicalities of ordering materials, crafting artisan drapes, and arranging installations.
Meanwhile, retail window treatment service models aren’t designed to handle delays or changes of direction.
They’re designed to pick a product, arrange for delivery, and call it a day. Design in a custom situation calls for something different – a partner and guide who takes the journey with you, ready to adjust and adapt as needed.
That’s what Amy and Nathan discovered in working with us, and as their guide, we let them in on the biggest secret of successful artisan window treatment design in custom-built homes.
Take it one step at a time.
Here’s the first step so many homeowners miss with window treatments and custom-built homes.
So many homeowners think of window treatments as the icing on a cake, the final design decision you’ll make after the walls are up and the paint has dried.
And this single mistake causes no end of headaches for homeowners with custom-built walls.
In fact, the walls are where the problems begin!
When you have long, sweeping corridors or tall, showcase windows, your window treatments will need a great deal of fabric. They’ll simply be heavy and the framing behind your drywall might need to be reinforced. Automation needs wiring installed in the right place. Ductwork needs to be routed properly (we’ll come back to that one in a bit).
Without proper preparation, so many of your favorite design ideas can be crushed because the infrastructure of the home isn’t prepared to support them. Meanwhile, the interior design ideas morph and change as a home takes shape.
So, don’t wait until walls are up to invite a designer into your home!
Your first step in finding the soul of your home should be inviting a custom designer to look at blueprints!
Start your custom window treatment design before construction begins!

Amy and Marlys collaborating and having a great time!
Amy called me in March of 2022. She and her husband, Nathan, were building a new home on the outskirts of the Portland Metro area. I had worked with them many years ago on their previous rural home, and I was thrilled to spend time with them again on this new adventure.
She emailed me their blueprints so I could get a feel of the house's layout before our first call.
During a long phone conversation with Amy, we discussed ideas and her dreams for draperies for their new home.
Because of her laser focus, and because we were so far ahead of the game, I decided to take her downtown to a professional fabric showroom which is only open to the trade.
Usually, this step is too overwhelming for people, but Amy had a clear enough vision that this would be a great experience. She walked into the showroom prepared with all her samples under her arm neatly tucked in a folder. Amy had already selected paint colors, flooring, and a Kit Miles wallpaper in the pattern UltraViolet Garden.

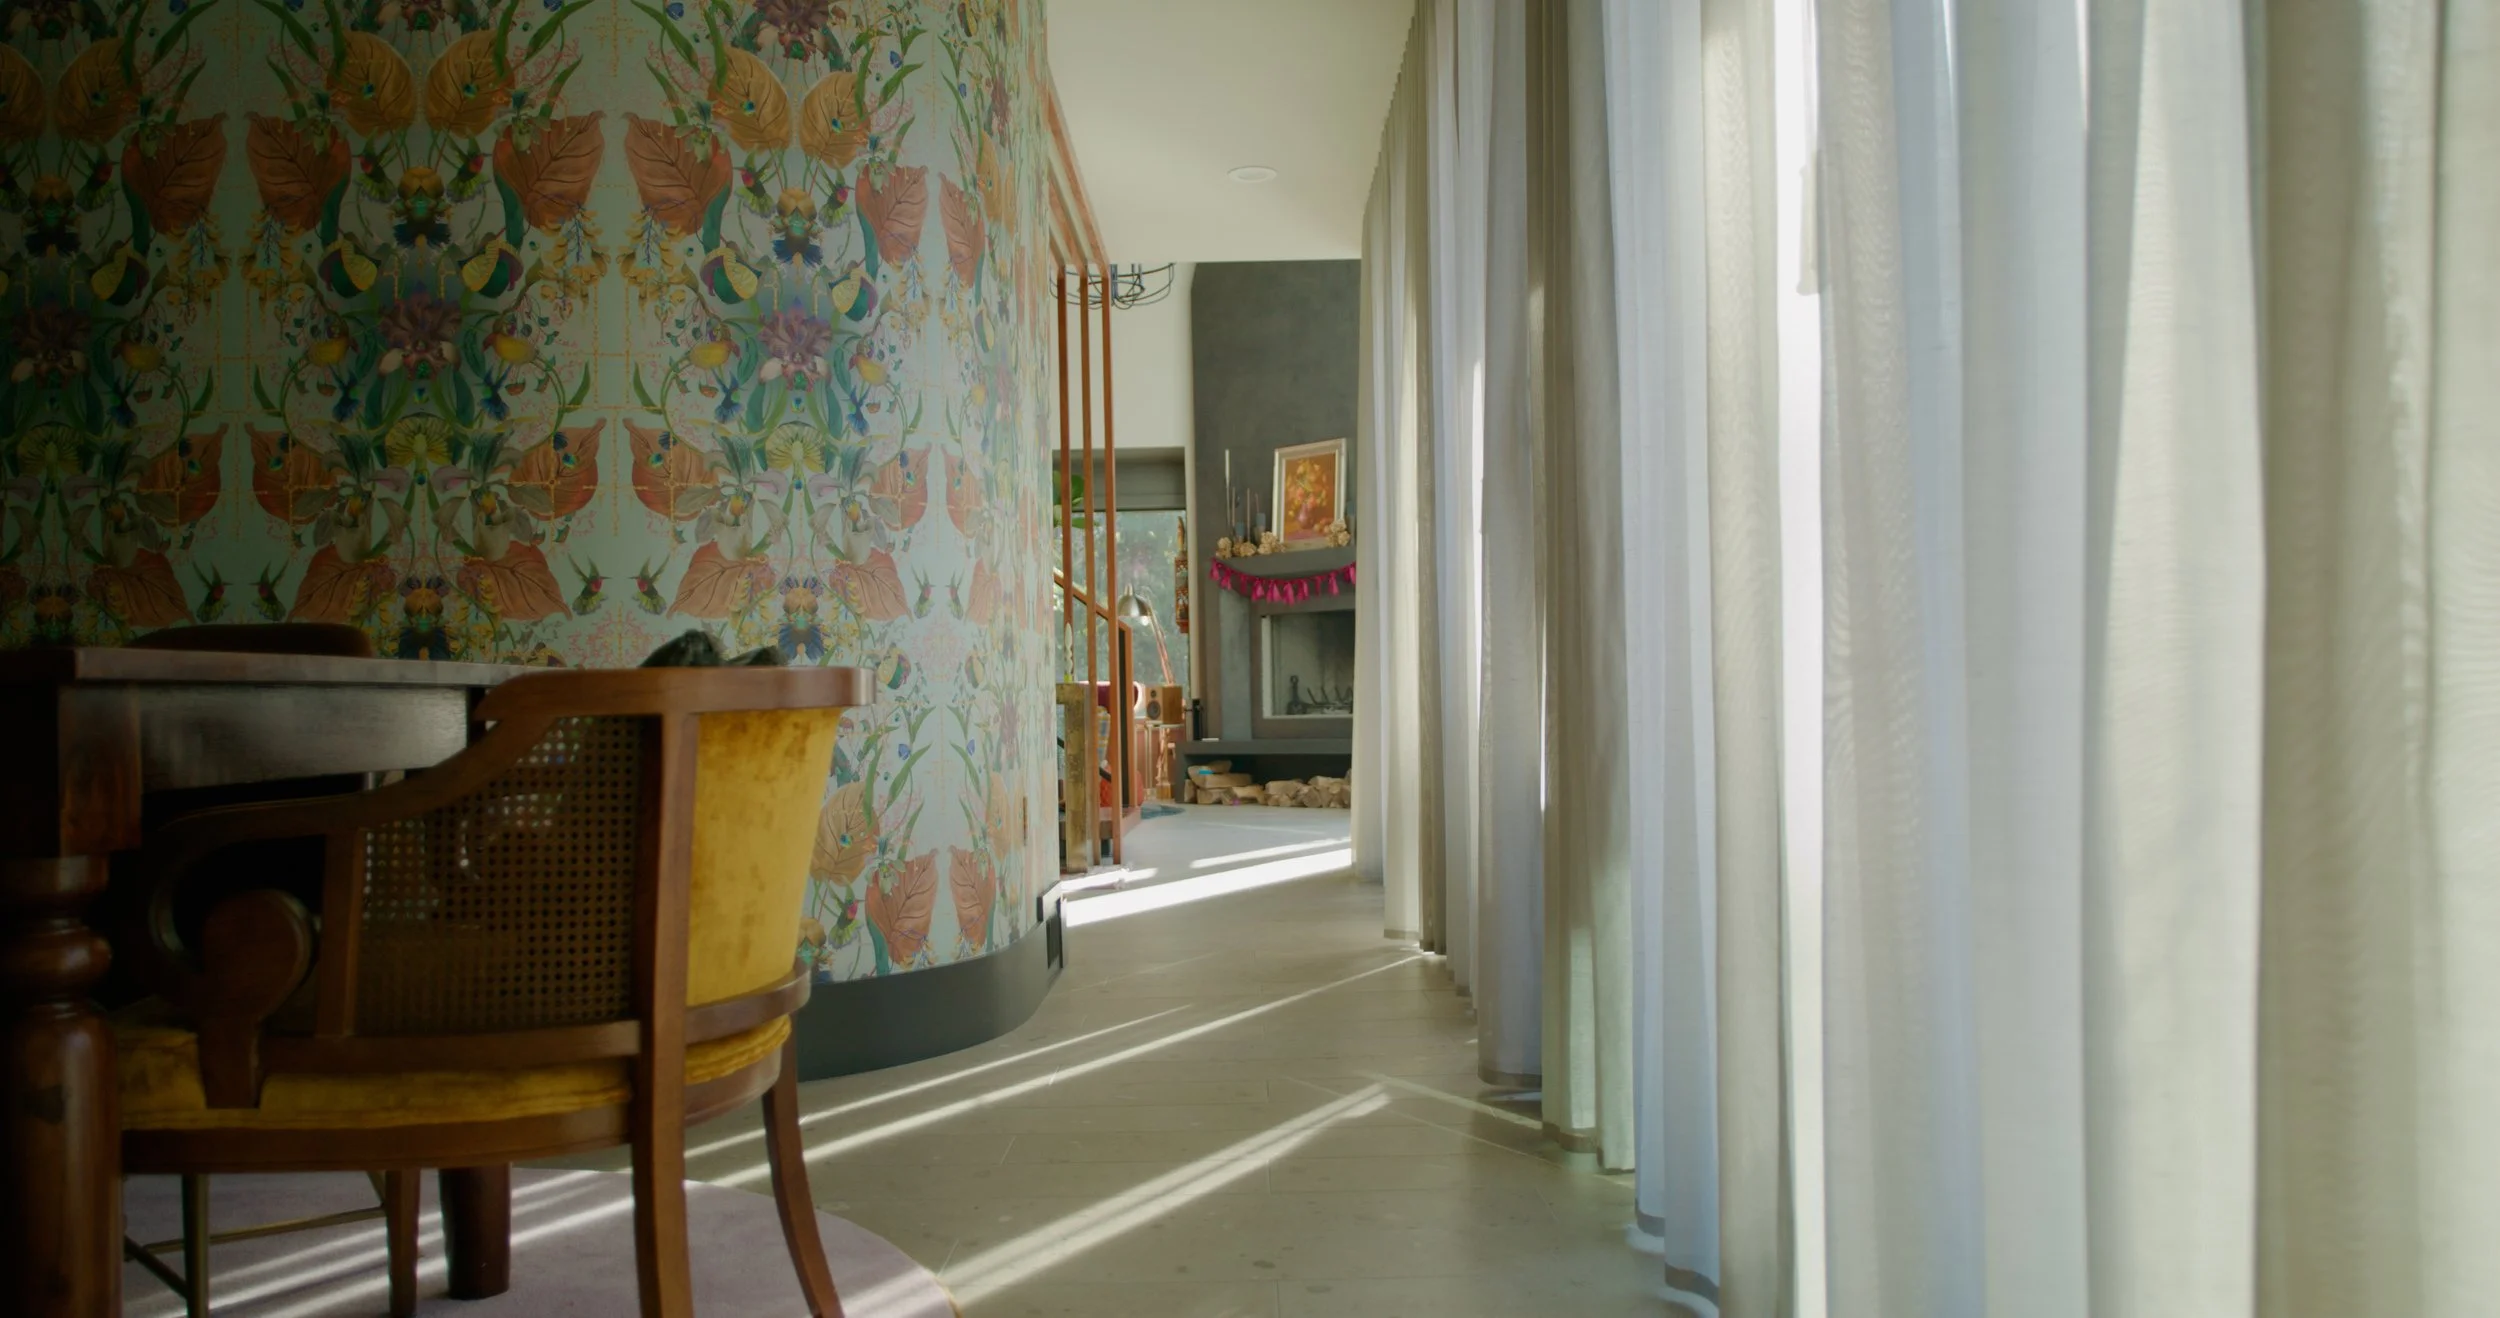
This gorgeous wallpaper, destined for the dramatic, curved interior wall of their home, featured an array of bold colors which I knew would set the stage for the entire house. After seeing her samples of colors, patterns, and textures, I was already getting a feel for the unique, vibrant direction that she wanted to go. As an artist, Amy envisioned a colorful, eclectic look for their home.
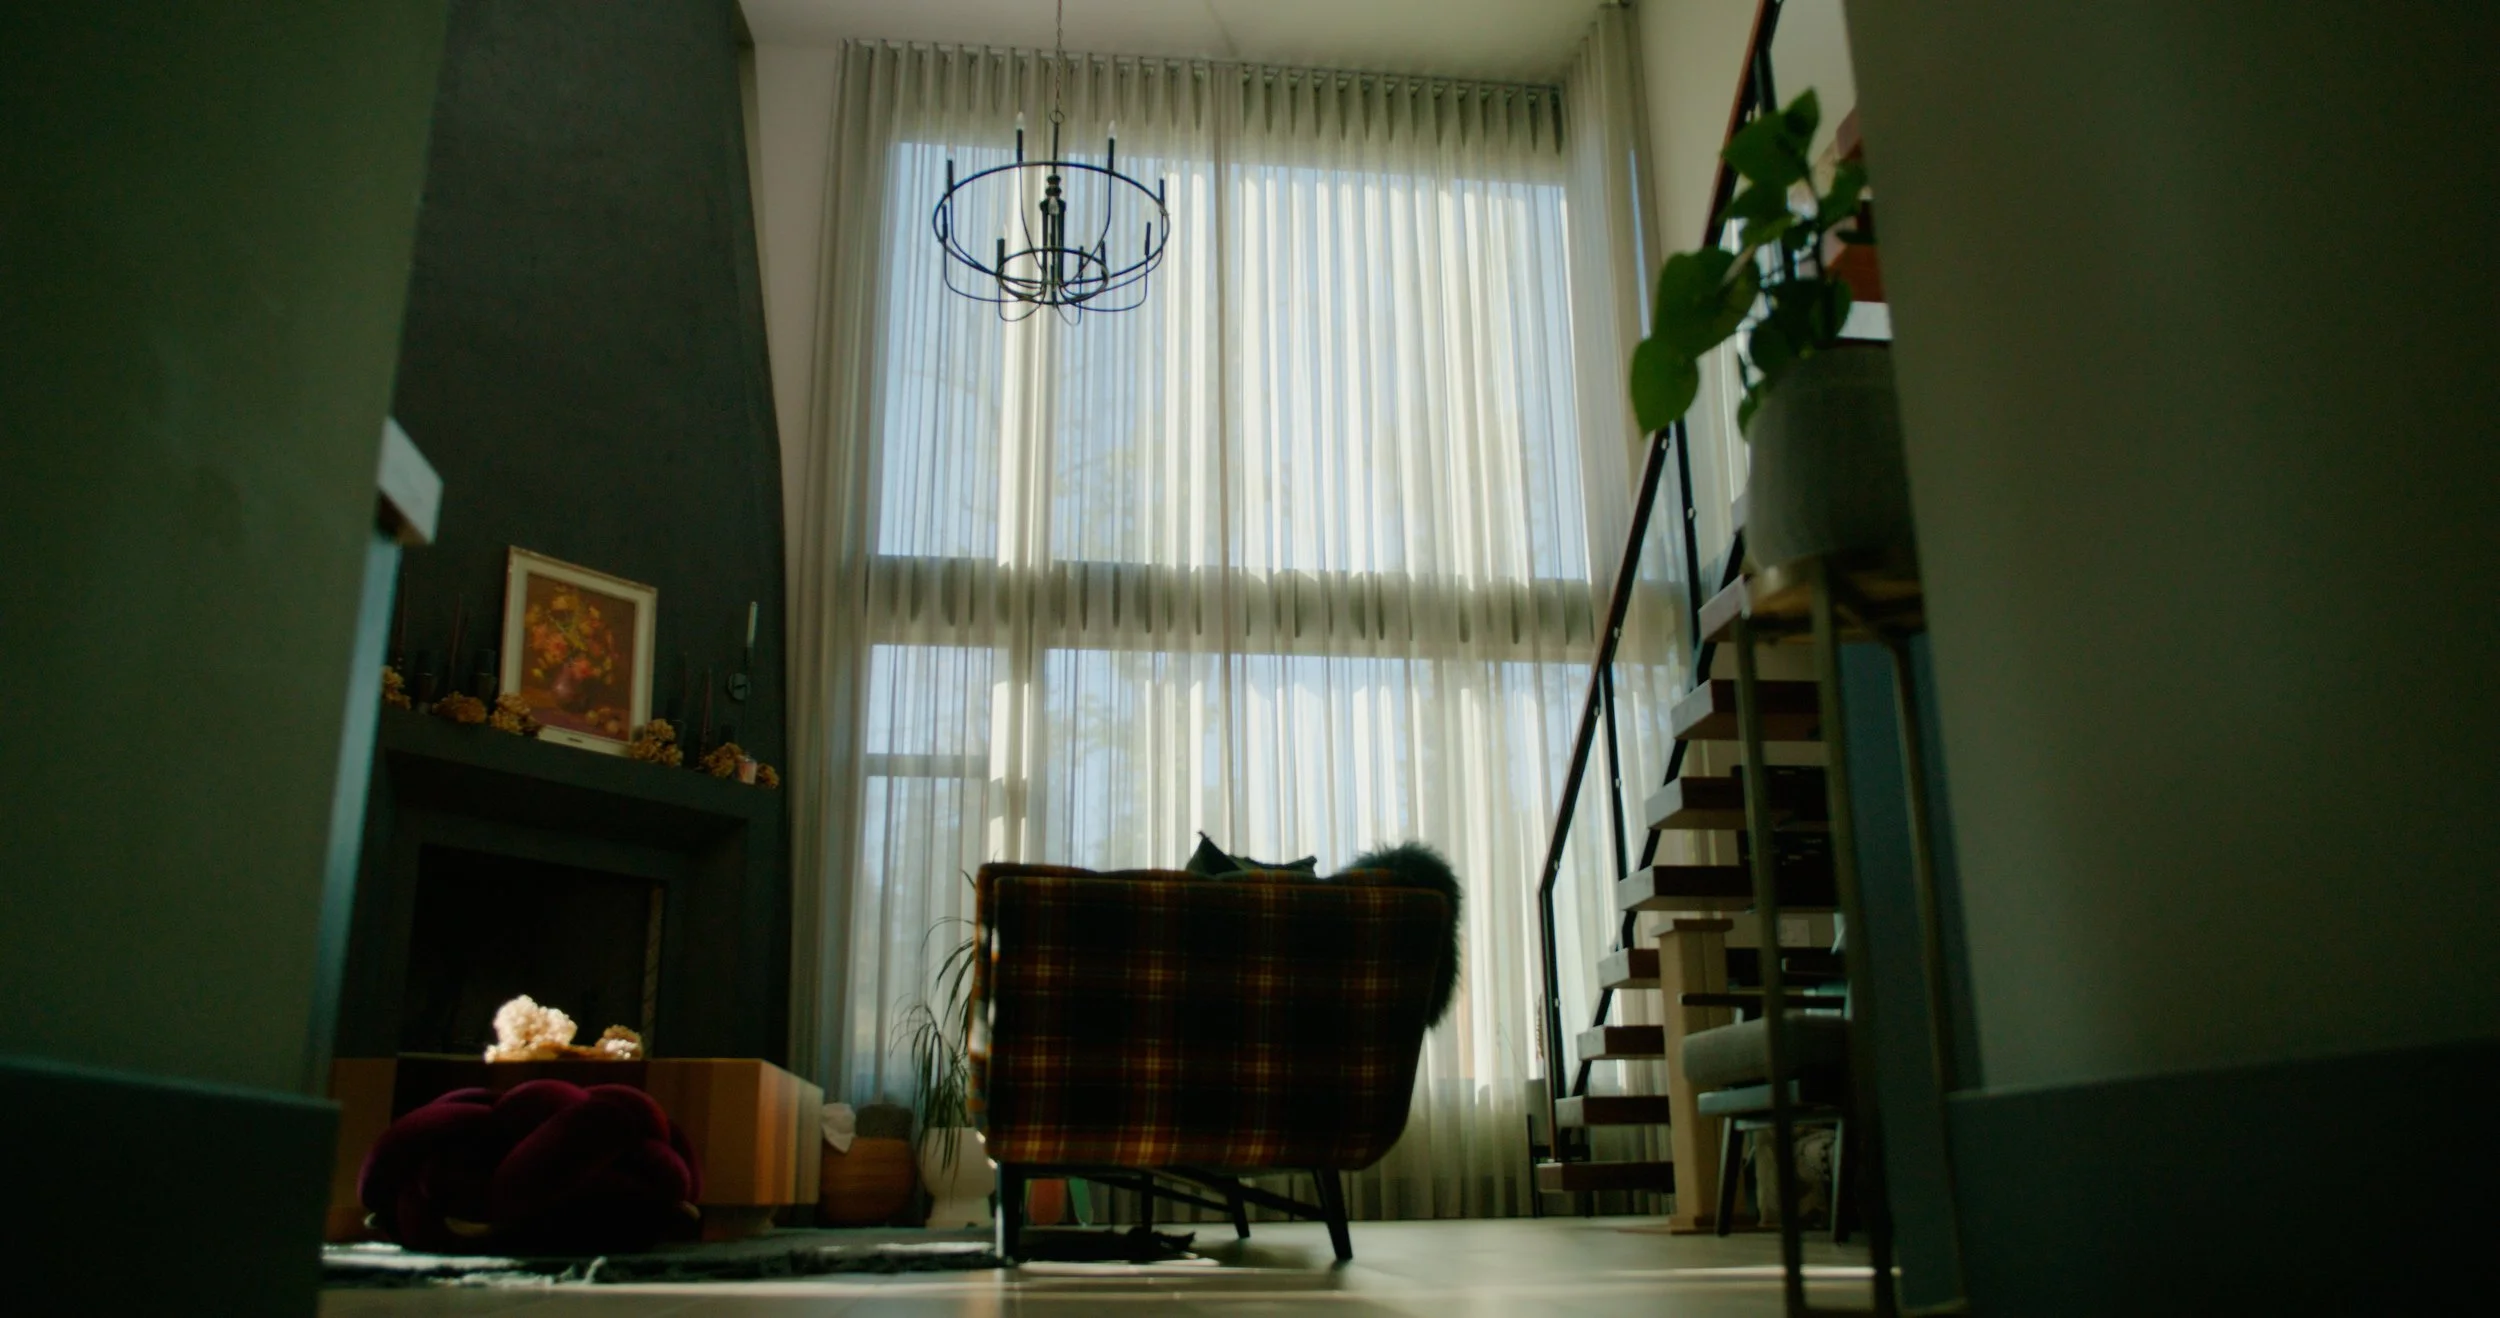
Her first thought for their family room, which would be painted Benjamin Moore's Salamander, an emerald green, was to find a sheer fabric in an ombre pattern, with subtle horizontal bands of color fading into each other in forest green tones.
While searching for this fabric, she fell in love with an emerald green velvet to blend in with the walls. She also found a sheer batiste fabric for sheer curtains for her extra tall living room windows and entry hall in a smokey color that would pull out tones from her dining room wallpaper and Benjamin Moore Horizon Gray paint.
She took fabric samples home to see how they looked both at night and daytime in their house. Our next step was to meet at their new place which was under construction and see what they thought about the fabrics.
Why a great window treatment design in a custom home starts with the studs . . .
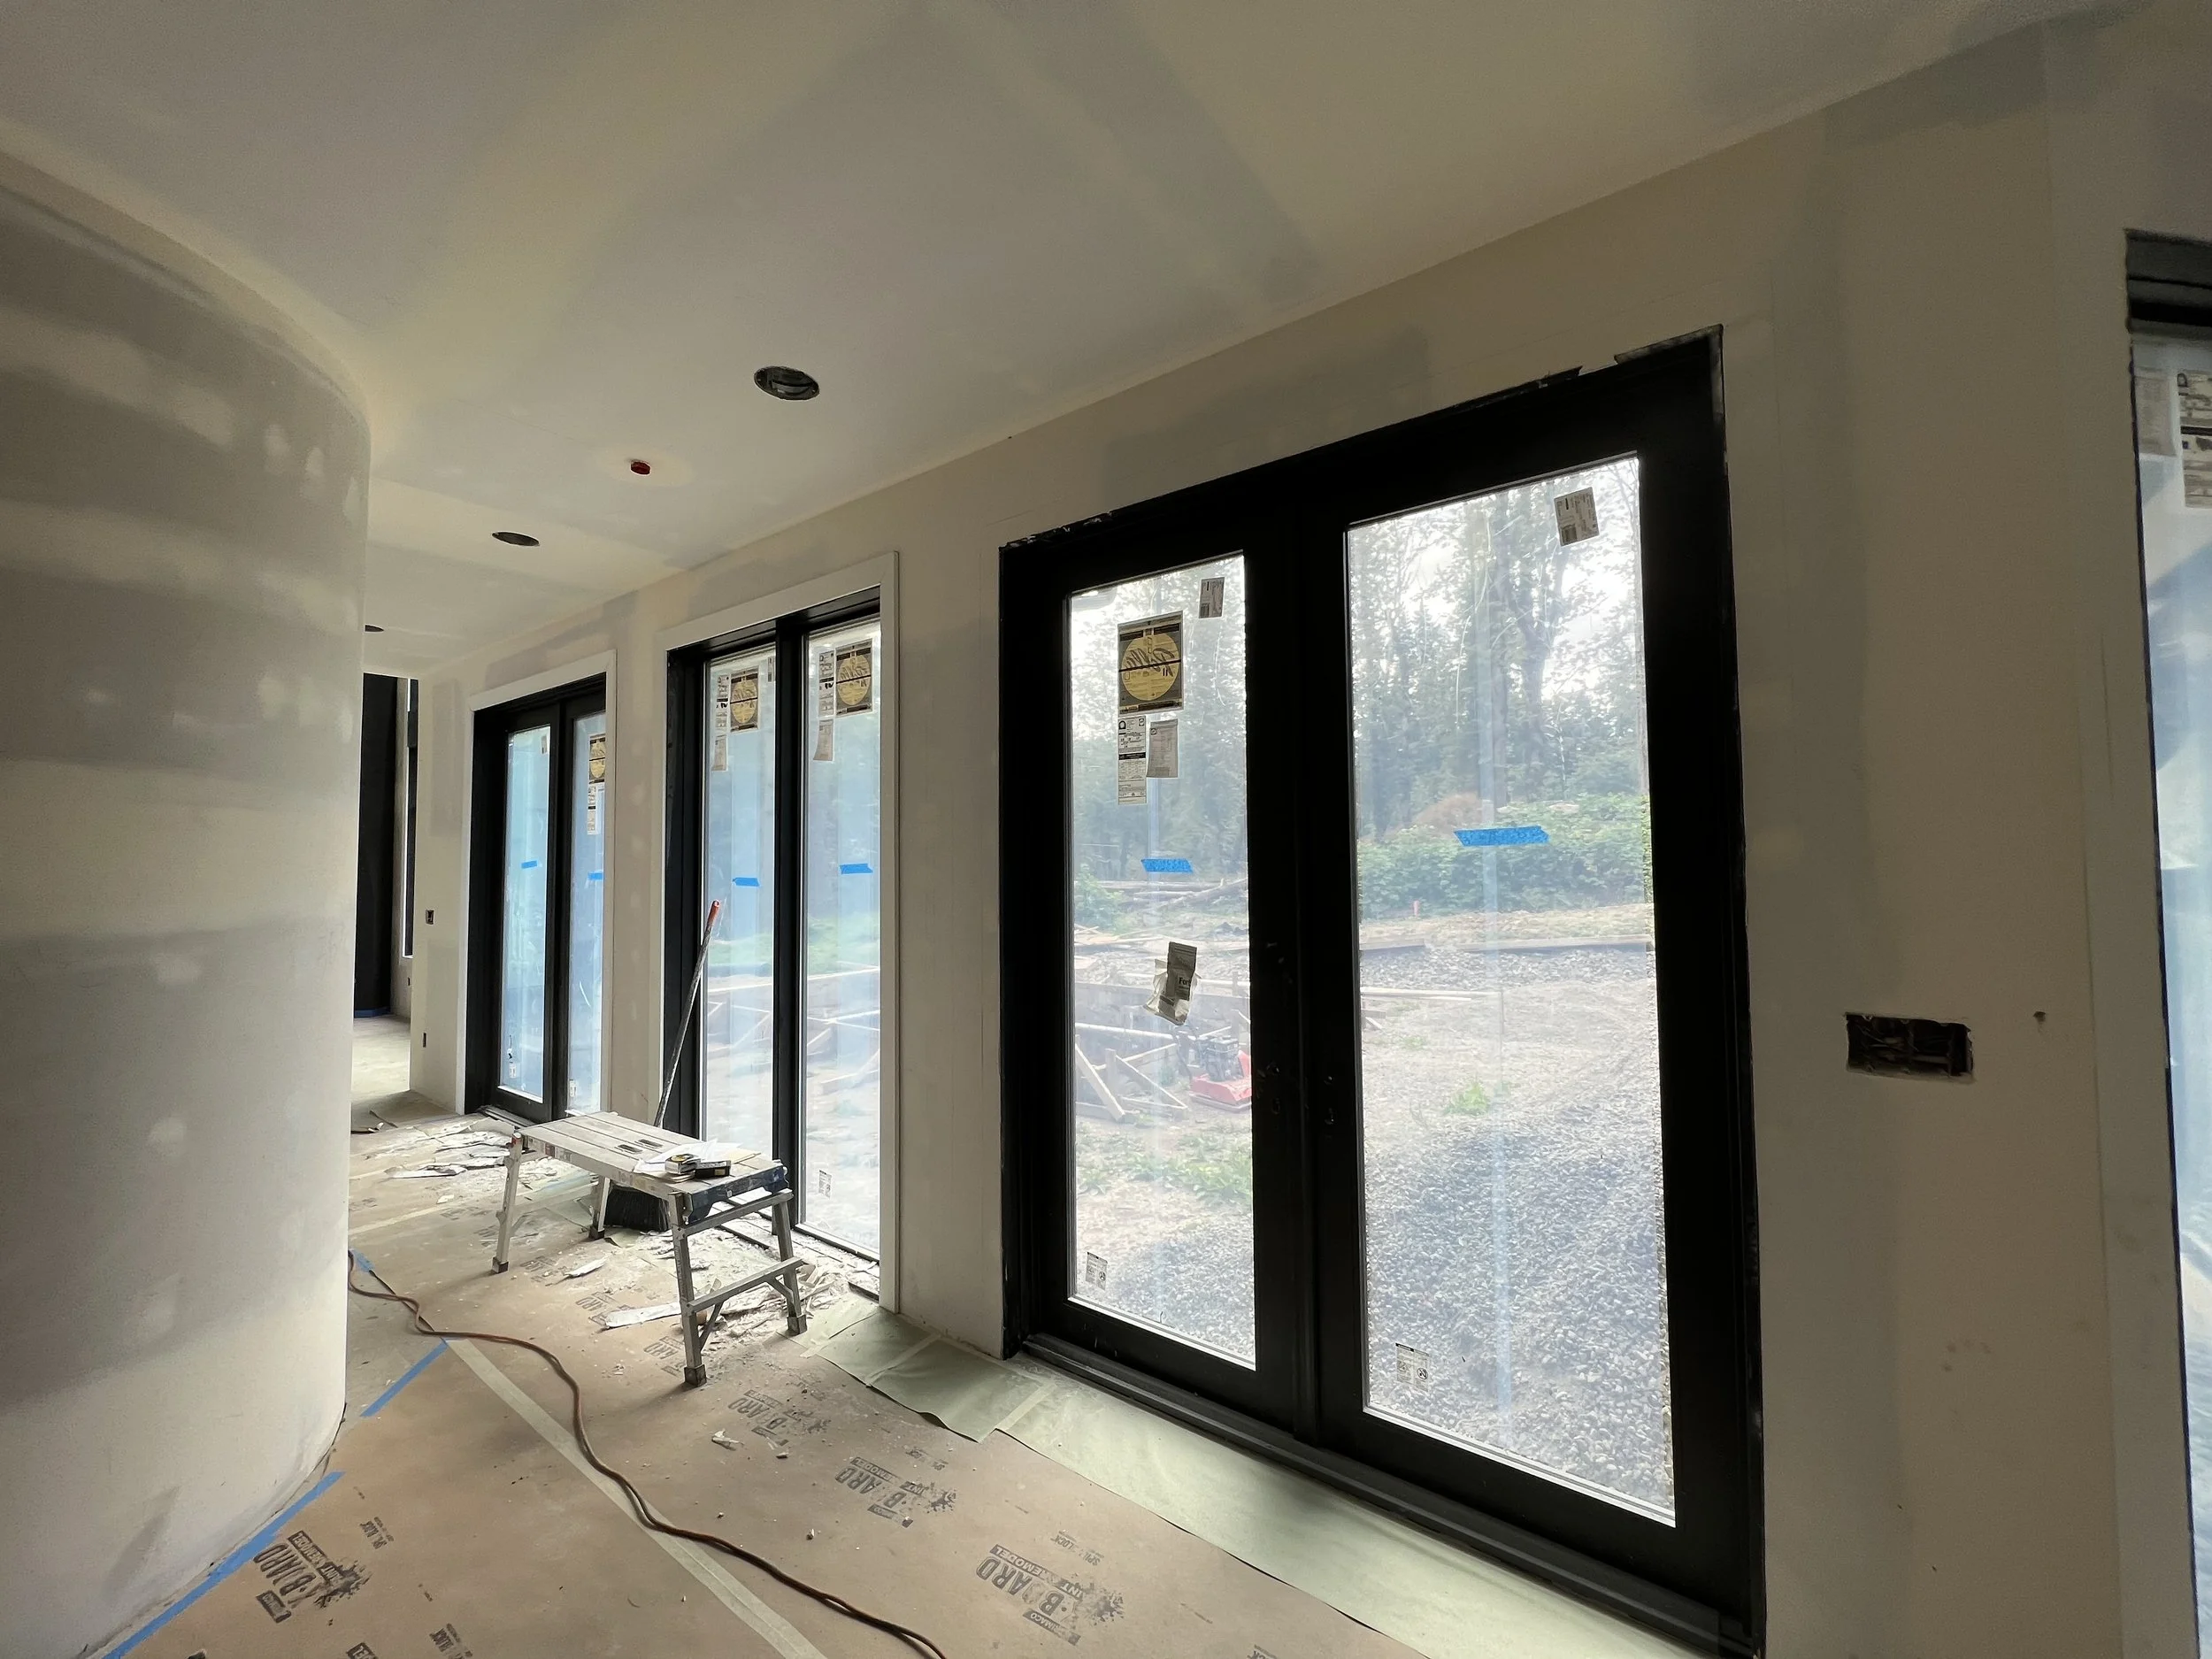
While at the house, I also took preliminary measurements even though the walls were only studs. Now was the time to help them understand all the details, especially where the draperies would be installed.
This early, careful step of reviewing the design onsite is essential.
There’s a big difference between seeing a small fabric sample and envisioning an entire wall of windows in this fabric.
We want to be sure about design decisions before ordering expensive hardware and materials for your home.
Your builder might need to make some adjustments to support the weight of a window treatment or route the proper wiring for automated drapery or shades.
Amy and Nathan quickly made final decisions on fabrics and hardware, and the process began. We ordered materials, and simple black ceiling-mounted drapery tracks were selected to blend in with the family room's dark green walls and ceiling.
Because of the intricacy of this installation, I would stop by many times in the coming months to check on measurements. As usual, this turned out to be essential.
Uncovering design challenges during construction.
Lo and behold, on one of my visits, there was ductwork running right through an area where we needed extra support for heavy draperies. One of the features of their custom home was an 18 ft. wide opening dividing the kitchen and family room, which would be covered by a long, dramatic one-way drapery panel.
Eighteen feet of velvet drapery needs solid support, and all of this fabric would stack in a concentrated 36” section of wall when opened. To ensure the installation would go smoothly, our installer met me at the house during construction to check that the bracket placement would not interfere with metal plates and ductwork that would soon hide behind drywall.
We found a solution, but discovering this later would have caused big questions, anguish, and costly delays.
Pivoting design choices as furniture pieces are selected.

Nathan’s Office
Furniture placement is incredibly important to understand during the design process.
For example, in Nathan’s office, we initially selected Hunter Douglas Gliding Panels that he wanted stacking off the windows. These panels need a good deal of wall-space to stack when open.
However, that was before Nathan discovered his dream bookcases and an antique tufted red leather sofa he couldn’t resist.
These would be centerpieces of the office interior design, but they would also leave us without room for the gliding panels. Instead, we determined that inside-mount roller shades would work better and give Nathan the view he desired while offering a neutral palette to unify the rest of the eclectic elements in the room.
Without professional guidance as to how the placement of furniture would affect the original shade selection, Amy & Nathan might easily have pushed forward with the initial choice only to have been frustrated later on. Likewise, it isn’t easy to pivot if everything has been ordered all at once up front.
Instead, a “one step at a time” cautious approach leaves room to pivot and alter course in pursuit of a spectacular final design.
What happens when the perfect-looking fabric won’t behave the way it’s supposed to?
Pivots happen later in the design and installation process, too, and they are far more navigable when you take things one step at a time.
A critical step in handcrafting custom, artisan drapes and shades is inspecting the fabric before it is cut.
After Amy’s chosen green velvet fabric arrived, it had creases that did not steam out. The fabric had even shipped from Europe in a suspension box, which meant the velvet fabric did not touch the sides of the box in shipping.
Three times we ordered the green velvet fabric, and each time it came in wrinkled. Finally, we changed course and decided to reselect the material. Amy had no problem reselecting and immediately gravitated to a grayish boucle fabric.
However, new fabric gave her a new idea! She envisioned having Ripplefold style draperies on the windows and the large drapery panel dividing the family room from the kitchen.
My immediate concern was how heavy this fabric was for a Ripplefold style. So, you can probably guess what happened next. We took things one step at a time! I told her I would order a yard of fabric and have our workroom make a Ripplefold panel to see how it would hang. Doing so proved to us that the material could work for this idea!
We ordered the fabric, fabricated the draperies, hung them, and we were all pleased with how stunning they turned out. They beautifully complement the paint color and all the unique furnishings.
Seeing it all come together.
Amy and Nathan’s construction process was much longer than originally planned, and it was a joy to see their vision come to life after such an unexpected wait.
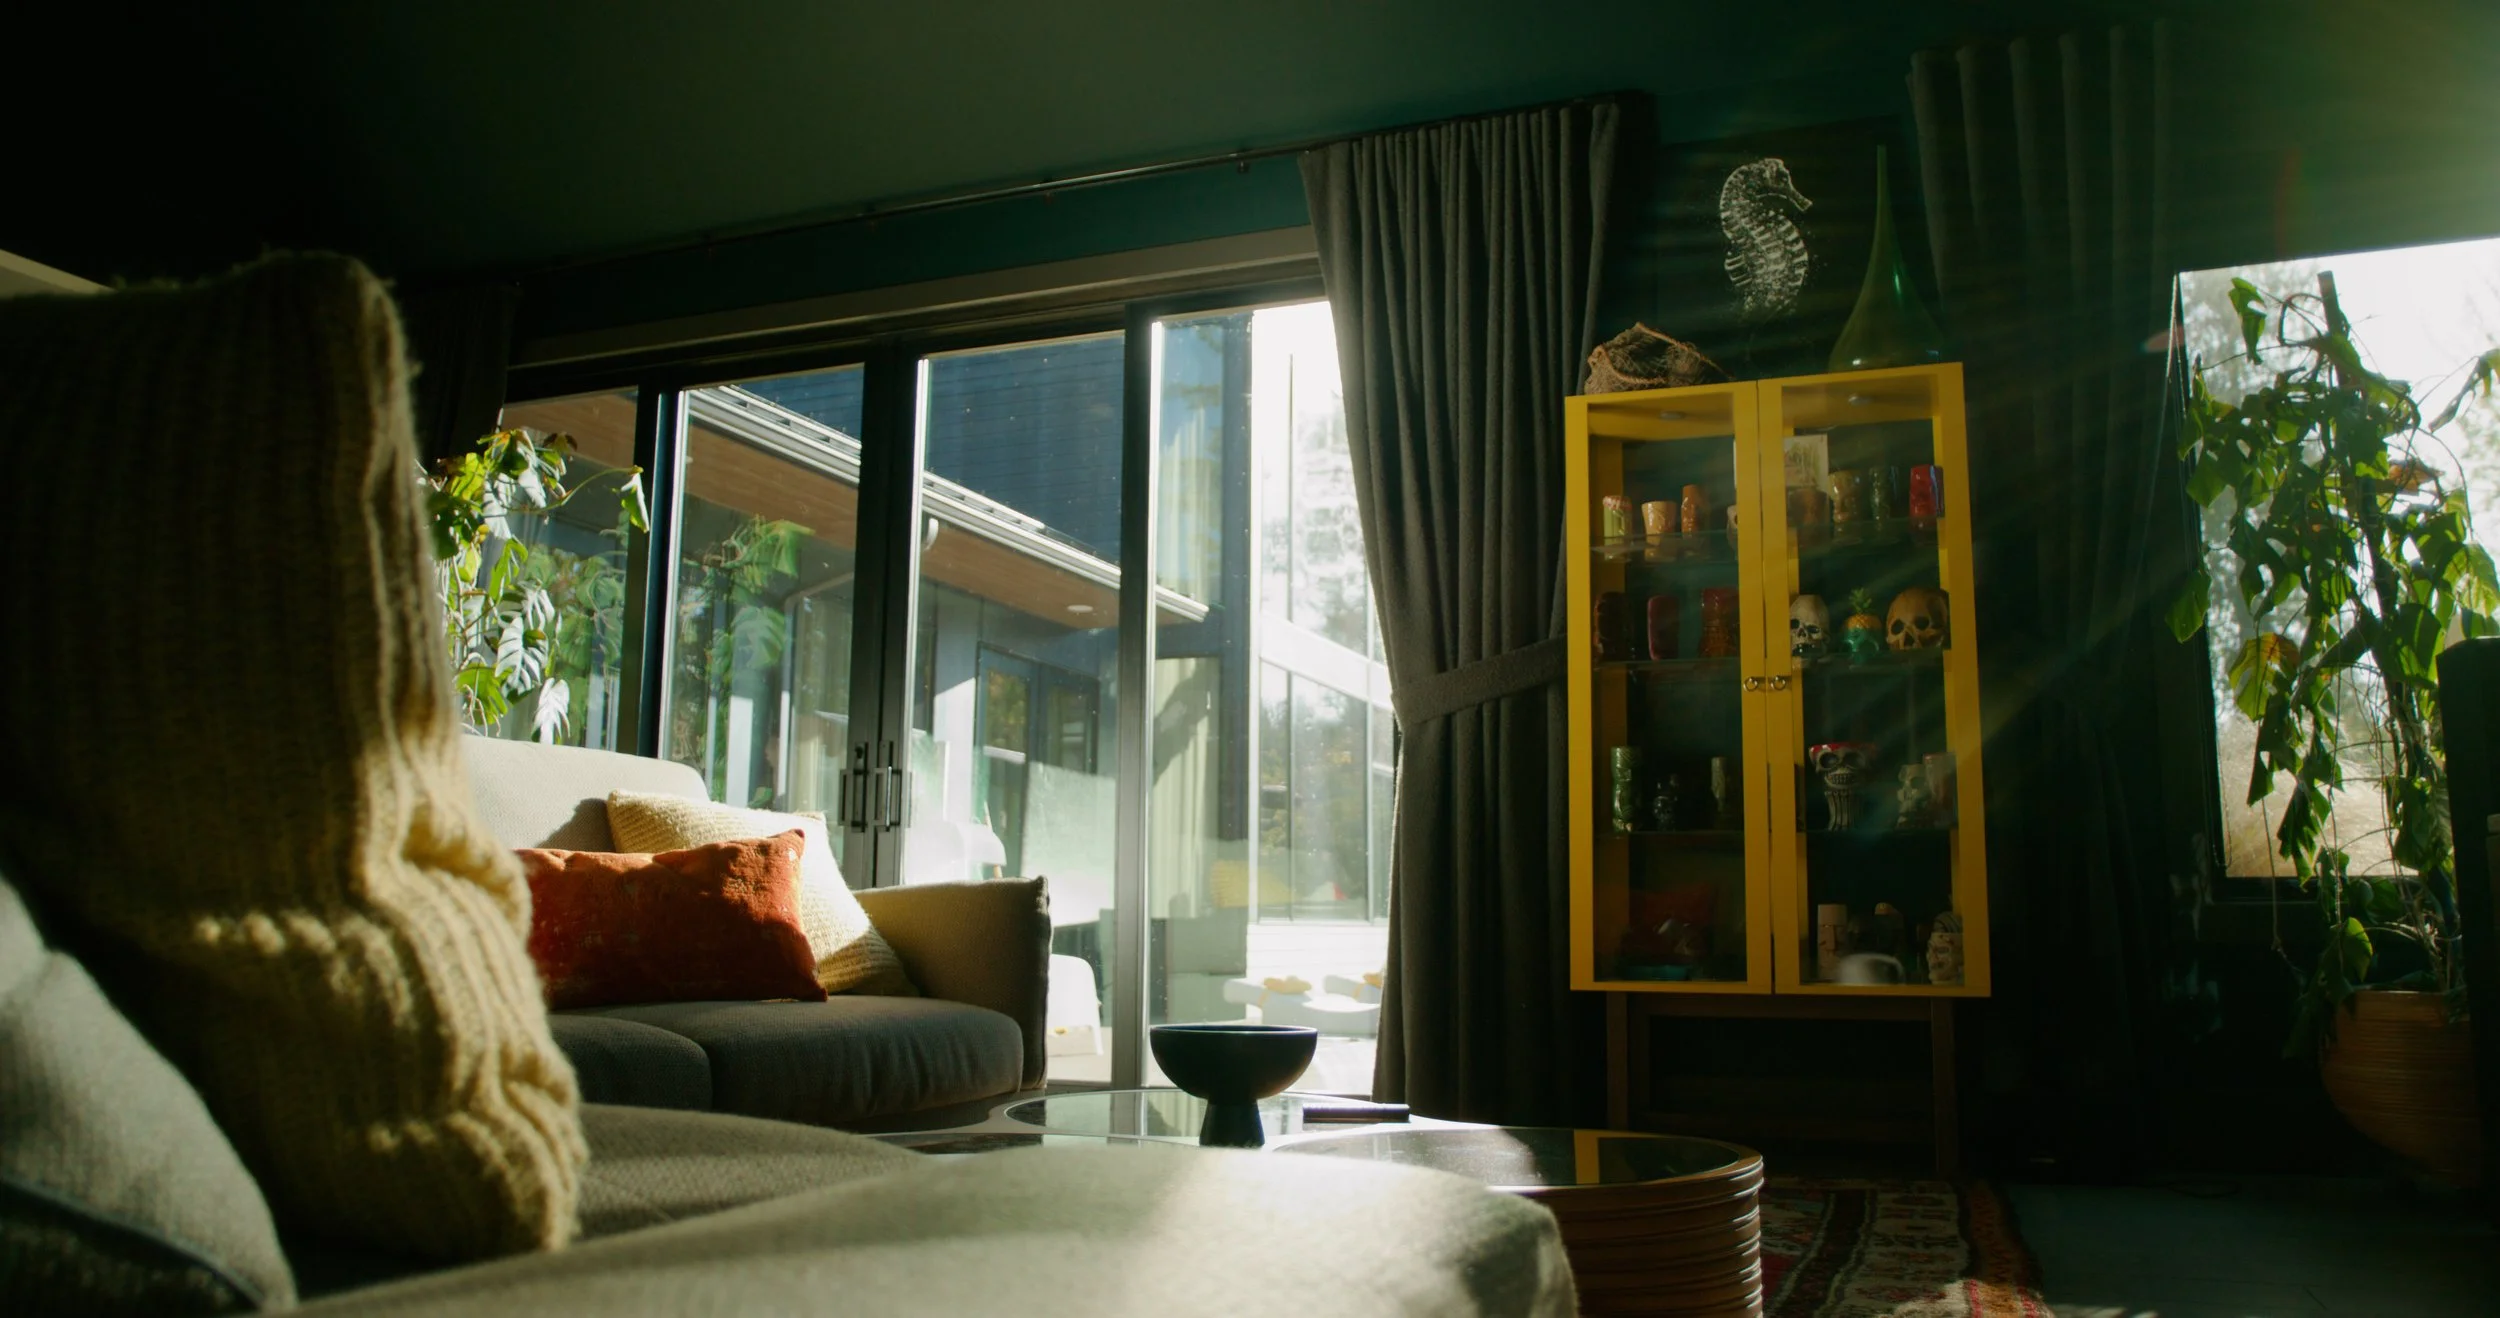
For the family room and the breakfast nook, we selected simple black sunscreen shades for the windows to filter out the sun while still allowing some see-through effect for enjoying the view.
The two banquettes they discovered were recovered by our talented upholsterer with faux leather seats and greige velvet backs.
The final touches in the living room came together after hanging Amy's dad's moose head high above the east-facing windows. The Roche Bobois sofas in a dark gray and orange plaid took their place, and the tall, Ripplefold sheers hung beautifully on the windows and graced the walls as a subtle backdrop for the moose head and other unique accessories in the room.

Both the color and design of the window treatments created an inviting palette which was agile enough to embrace their eclectic design choices.
Today, the modern pieces mingle well with the antique furnishings, and all the colorful finishes bring a sense of warmth and hominess to this home. And as Amy said,
“Our house now feels like it has a soul.”
There’s no greater win in interior design than this. We were proud to be part of the journey.
This final result was one part inspiration, one part experience, and one part having patience to move slowly in a step-by-step process that left room to pivot, bob, and weave as the home took shape.
What the custom window treatment design process should feel like.
We thought this bit Amy shared with us after the project was particularly important for other clients to hear.
“We worked with Marlys over the course of a year or so while we were building our new home. Her care and attention to detail were one of the best parts of the build and a welcome relief from dealing with our numerous other contractors.”
Designing your home’s interior, including your window treatments, should be a joyful experience! You’re creating spaces meant to inspire, where guests gather to fill the home with wonderful memories.
In short, the process should bring relief, not strife, even in the midst of the chaos of custom construction.
At Adrette, we guide clients with decades of expertise and genuine investment in their hopes and dreams for their homes. Schedule a free design discovery call here to begin a joyful journey of transformation in your home through custom window treatment design.
-
You should begin planning as soon as your blueprints are ready.
Many custom window treatments require reinforced framing, wiring for automation, and proper ductwork routing. Starting early ensures your home is structurally prepared for the design you want and prevents costly changes later in construction. -
Waiting too long can limit your design options.
Tall windows, curved walls, and specialty hardware often need support built inside the walls long before drywall goes up. If planning happens too late, homeowners may be forced to compromise on fabrics, automation features, or installation placement. -
Common challenges include:
Ductwork installed where drapery supports need to go
Missing structural backing for heavy fabrics
Wiring placed incorrectly for automated shades and drapes
Furniture placement changing after initial design plans
Working with an experienced design professional ensures these issues are caught early, not after it’s too late to fix them.
-
This happens more often than most homeowners realize.
Even high-end fabrics can arrive with flaws, react unexpectedly when installed, or look different in natural light. A designer will test materials, order samples, and, if necessary, help you pivot to a better fabric—before proceeding with the fabrication. -
A designer guides you step by step through the entire process.
From reviewing blueprints to measuring during the framing stage, checking installer needs, adjusting for furniture layout, testing fabrics, and coordinating with contractors, an experienced designer reduces stress and brings clarity to every decision—so the process remains joyful, not chaotic.